The fishtail braid is all the rage and Janet Williams, from The Soteco Rhodes Salon in Iowa, shared photos and tips with us for the perfect redhead braid. There are many different ways to fishtail, but the most intricate, Janet said, “It is best to get help from a professional or friend because doing it on your own can get a bit tricky.”
Here are the 11 steps to getting a stellar fishtail braid:
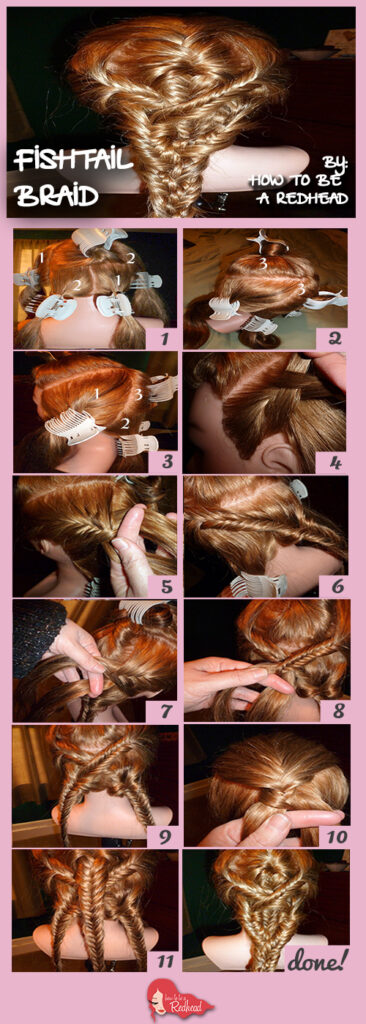
1-3. Separate the hair into 6 sections. There are only 3 braids so the sections are numbered to show that a braid starts in one section and ends in another. Braid #1 starts on the front left side and incorporates into the bottom right side. Braid #2 starts on the front right side and ends in the bottom left side.
Braid # 3 starts in the triangular section at the top (wide side of triangle at hairline) and ends in the triangular section in the back. The points of these 2 triangles meet in the crown.
Then, start from here…
4. Make a fishtail braid, adding hair from both sides as you move along.
5. Continue the fishtail. In wider areas of the section, you will be adding longer slices of addition hair, less in narrow areas. Work accordingly. When you reach the end of the section, you will continue to braid without adding hair.
6. The braid will overlap the bottom, left section. When you reach the bottom, right section, start adding hair again.
7. Continue braid to the ends, securing with bob pins (can’t wait for the Redhead Bobby Pins to be released!)
8 & 9. Move to front, right side and start again, with braid #2.
10. During the part of the braid where you are not adding hair, you will overlap braid #1.
11. Then, start adding hair when you reach the bottom, left section. Again, finish braiding to ends and secure ends with a bob pin.
Work into lower triangle, adding hair.
Work all of the way down. Secure ends. Then, go through braids and loosen them to your desired look.
Braid the 3 braids together and secure with a band.
Tip: You can do the center braids first and create this look. Or you can work the free braid into whichever level you want, before the finishing braid.